Using JMeter with ASP.NET WebForms Authentication
I recently ran into a situation where I needed to quickly simulate a large number of concurrent users running through a very simple path in an ASP.NET WebForms application. Apache JMeter quickly emerged as the best tool for the job. The Recording Proxy made creating the Test Plan a breeze. I was impressed and optimistic as I let the tool loose on the site but disappointed when every request returned a redirect (302) to the login page. (View request/response results in a “View Results Tree” element in your Thread Group)
<html><head><title>Object moved</title></head><body>
<h2>Object moved to <a href="%2fwebFormsApp%2fweb%2fauthorization%2fAccess.aspx">here</a>.</h2>
</body></html>
After a bit of research, it became apparent that JMeter was running into issues with VIEWSTATE, which is one of the workarounds ASP.NET WebForms uses to make HTTP appear to be stateful. Essentially, JMeter is sending a stale value for VIEWSTATE since it is replaying the HTTP requests in the test plan. We need to extract the VIEWSTATE from each response and re-include that value on our requests or ASP.NET WebForms will redirect to the login page. We will do that with two Regular Expression Extractors.
Regular Expression Extractors
Our first regular expression extractor will grab the page’s VIEWSTATE element and store it in the JMeter viewState variable. Add a new Regular Expression Extractor in JMeter by:
- Right click on your Thread Group
- Choose Add -> Post Processors -> Regular Expression Extractor
- Configure as follows
- Reference Name:
viewState - Regular Expression:
name="__VIEWSTATE" id="__VIEWSTATE" value="(.+?)" - Template:
$1$ - Math No:
1 - Default Value:
ERROR
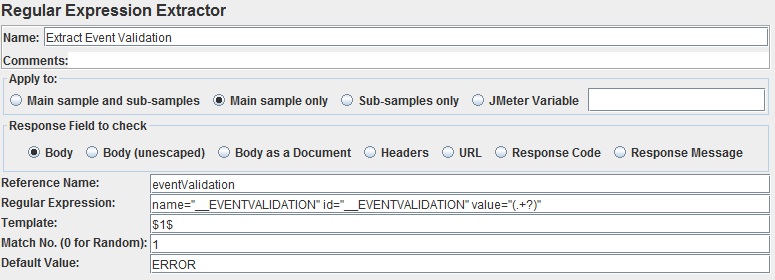
- Reference Name:

We also need to include a regex extractor that stores the EVENTVALIDATION element in the eventValidation variable. Again:
- Right click on your Thread Group
- Choose Add -> Post Processors -> Regular Expression Extractor
- Configure as follows
- Reference Name:
eventValidation - Regular Expression:
name="__EVENTVALIDATION" id="__EVENTVALIDATION" value="(.+?)" - Template:
$1$ - Math No:
1 - Default Value:
ERROR
- Reference Name:
Using the Extracted Values
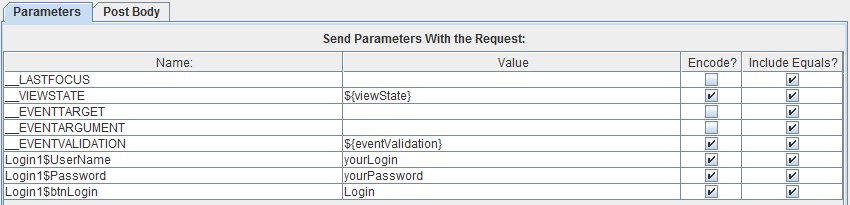
Now that we have populated the viewState and eventValidation values, we need to include them when we POST to our application. In my run, this only happened on the login page.
- Select your login page POST in the Test Plan’s Recording Controller
- Set the
__VIEWSTATEparameter to${viewState} - Set the
__EVENTVALIDATIONparameter to${eventValidation}
HTTP Cookie Manager
If you run your test plan now, you will see that it is still not working. This is because ASP.NET WebForms uses a cookie to store the login session. We can solve this with JMeter’s “HTTP Cookie Manager”.
- Right click on your Thread Group
- Choose Add -> Config Element -> HTTP Cookie Manager
Finally, run your Test Plan. You should see that your WebForms application returns the correct responses to JMeter’s requests. If not, double check that you are using the viewState and eventValidation variables in your login page POST (or any other post, for that matter) and that you have added the Cookie Manager.
Bonus - Parameterize Credentials Across Threads
Application performance for multiple concurrent logins with the same user is probably not a very interesting test case for your system. Luckily, it is extremely easy to parameterize login credentials for JMeter threads with a “CSV Data Set Config” element.
Store Credentials in CSV File
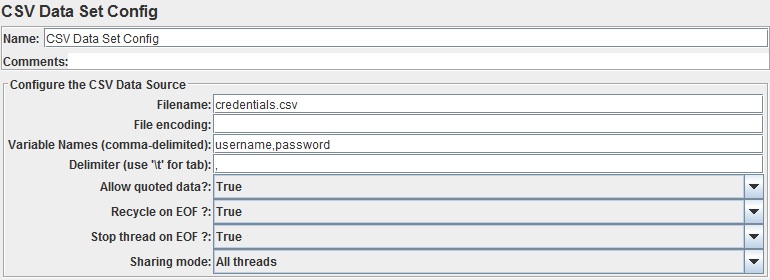
- Create a text file named
credentials.csvin the same directory as your Test Plan.jmxfile - Populate
credentials.csvwith the login credentials you want to use (mind extra spaces)
login_1,password_1
login_2,password_2
login_3,password_3
Add CSV Data Set Config
- Select your Thread Group
- Choose Add -> Config Element -> CSV Data Set Config
- Configure as follows
- Filename:
credentials.csv - Variable Names:
username,password
- Filename:
Use Variable Credentials in Login Post
- Select your login page POST in the Test Plan’s Recording Controller
- Configure as follows
- <Your Login Element ID> :
${username} - <Your Password Element ID> :
${password}
- <Your Login Element ID> :
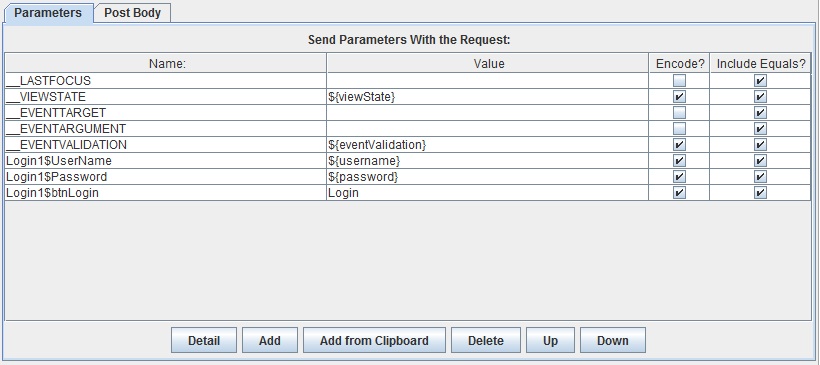
Now the threads in your Test Plan will cycle through the credentials specified in your CSV.
Acknowledgements
The following articles were extremely helpful in figuring all of this out:
- Technically Works: Load Testing SharePoint (MOSS) Sites with JMeter
- Technically Works: Load Testing ASP.NET Sites with JMeter
- JMeter Tips: Tip #7: How to add cookie support to your Test Plan
comments powered by Disqus